How to Integrate Firebase in Android Applications
Hey Everyone!
Today I would like to discuss about Firebase and how you can integrate it in your Android application with few simple steps.
What is Firebase
Firebase is basically a mobile and web application development platform that help developers and companies to quickly integrate some very exciting as well as interesting features in their applications.
Although it was initially introduced and developed by Firebase Inc as a company itself in 2011 as a separate platform. And at that time it was just used for real time data synchronization and hosting in cloud by different mobile applications, including Android and iOS. But, later it was acquired by Google in 2014 and they upgraded it by merging and implementing many different and exciting features and established it as complete cloud based app development platform with support of both mobile and web applications.
Firebase Features, Products and Benefits
By time of writing this article Firebase provide or support almost 18+ different products and features. Some of these products run only on device or server and some require cloud integration. Here is list of some key features of Firebase.
- Cloud Storage and Filestore
- Cloud Functions or Serverless APIs
- Web and Restful APIs Hosting
- Firebase ML or Cloud based Machine Learning
- Secure User Authentication
- Performance Monitoring and Crash Reports
- Cloud Messaging and Push Notifications
- Google Analytics
- Etc.
Recently Google has split Firebase ML into two parts. One is cloud based Machine Learning or Firebase ML and other has been introduced as a separate SDK with support of some on-device features as ML-Kit. This ML-Kit include Google Vision APIs for barcode scanning, face detection, image labeling, etc.
Steps to integrate Firebase in Android application
Although, you can just read this tutorial to learn or understand the basic concept and flow of Firebase integration in Android applications. But, getting your hands dirty is always a good approach to learn something new. That’s why I would recommend you to also practice all of these steps by actually integrating Firebase in a test or demo Android application yourself.
Create or Configure Android Project
Integration of Firebase in Android application also have some prerequisites and recommendations.
Install or update your Android Studio to its latest version. Minimum recommended version is 3.6.x. But, latest stable version of Android Studio available online is 4.0.0. So it’s your choice which version you would like to use.
Please go ahead and install or update your Android Studio to fulfill this basic requirement. You can download it from here if you don’t already have one installed on your machine.
Here are some other prerequisites that you should configure or enable in your new or existing Android application project to integrate Firebase.
First, make sure to configure your project to support these recommended Android API Levels and Gradle Plugin.
- Target API Level
16or later. This can be configured in your app levelbuild.gradlefile usingtargetSdkVersionproperty. - Compile SDK must be
28or later. This can also be controlled by changingcompileSdkVersoinproperty in your app levelbuild.gradlefile.
Second, also configure your project to use Jetpack (AndroidX) by using version 3.2.1 or later of Gradle build tools and version 28 or later for compileSdkVersion.
As soon as you update your existing or new android project to fulfill these prerequisites, you will be ready to start integrating Firebase in you Android application.
You can integrate or connect your Android application to Firebase using one of these options.
- Use Firebase console setup workflow
- Use Android Studio’s Firebase assistant.
I will use option one; As it is the easiest and also recommended way to integrate Firebase in any new or existing application.
Create Firebase Project
Firebase integration in any other application require you to create a new Firebase project using Firebase console. For example, I have created a new Firebase project for this guide with name of “FirebaseIntegrationDemo”.
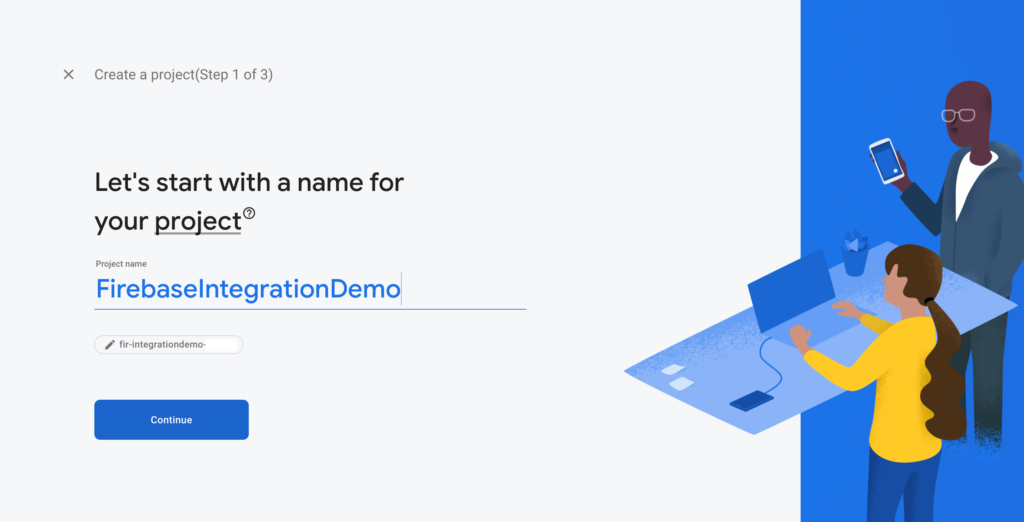
Creating a Firebase project will help you to manage and configure different Firebase features and products. When you enter name of your project and press “Continue”, Firebase will ask you to select whether you would like to enable “Google Analytics” support for this project or not. We will not need “Google Analytics” for a demo application. Therefore, just disable this for now and click “Continue”.
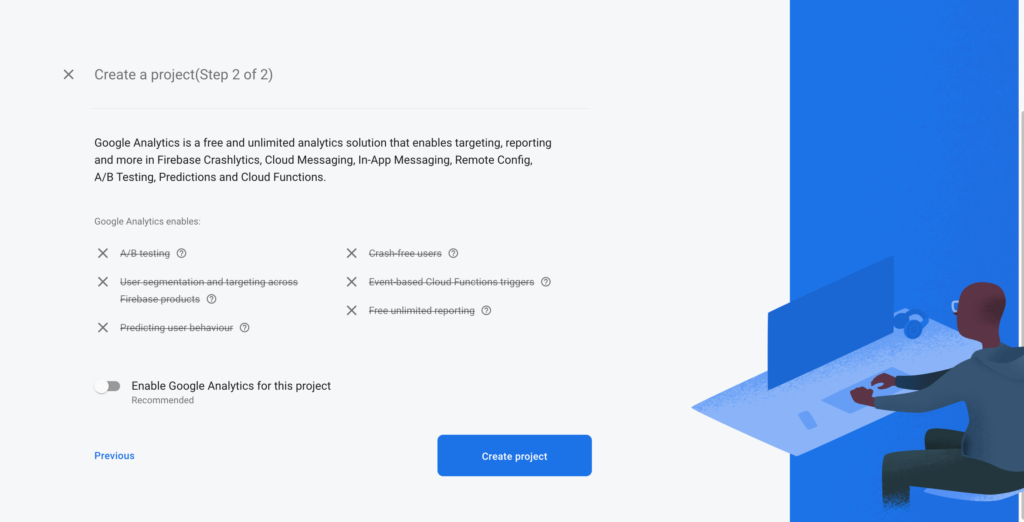
If you disable “Google Analytics” support, Firebase will create your project and take you to your Firebase project dashboard.
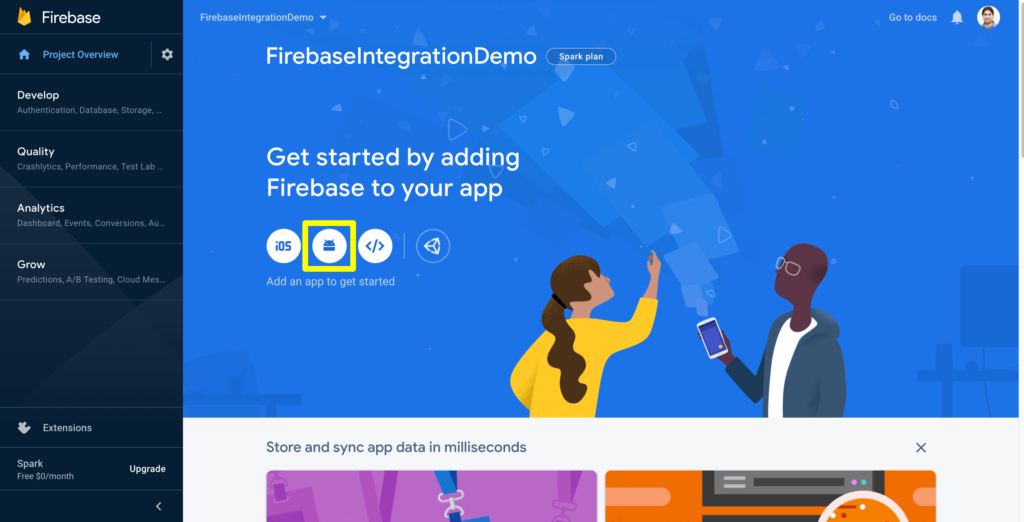
Register your application with Firebase
Now next step is to register your application with Firebase using your Firebase project. Please click on “Android” icon as high-lighted in image below to register your application with current Firebase project.
Firebase will ask you to provide package name of your android application. Please carefully choose a unique package name for your application. Recommended package name is something like this com.companyname.appname. I have used com.zeeshanelahi.firebaseintegrationdemoandroid for our demo application. You can leave other two empty for now; As we will not these in this tutorial. Please press “Register app” to register your application.
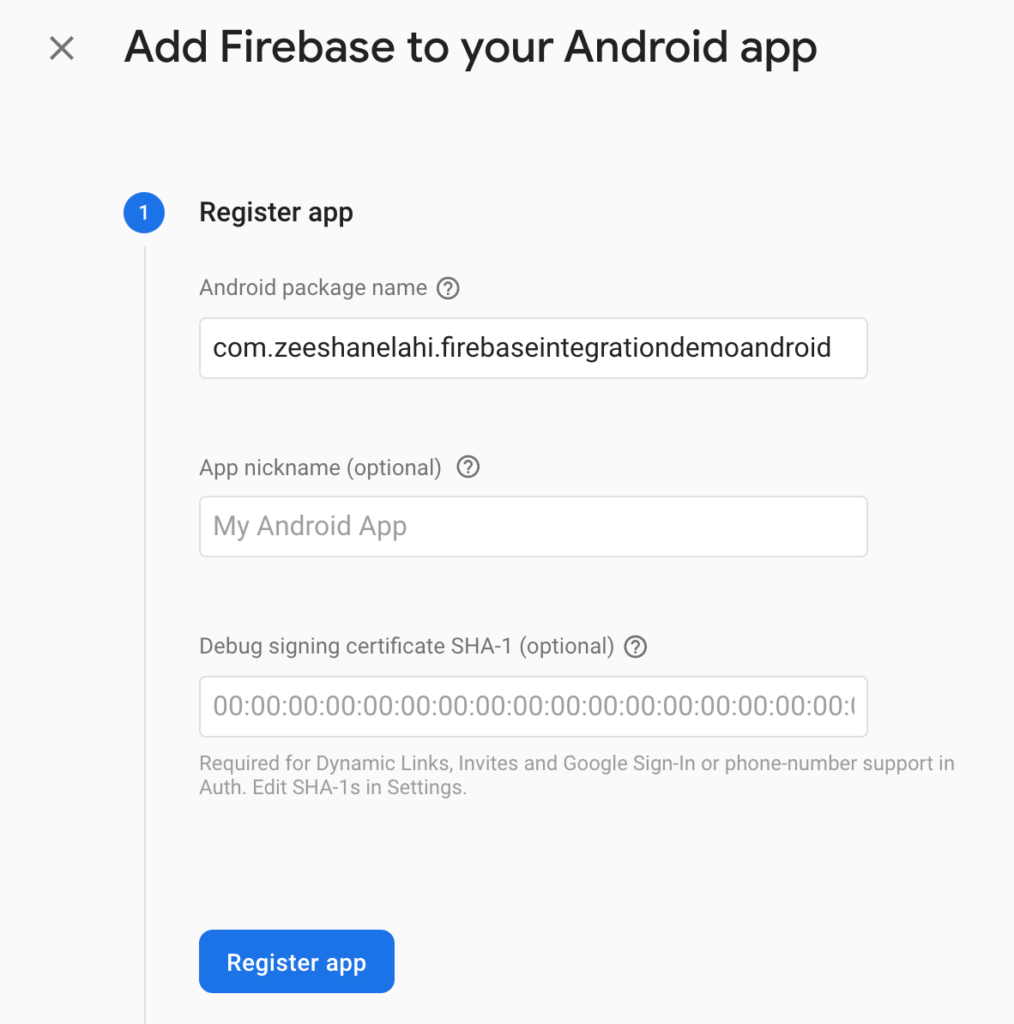
Firebase will register your application with current Firebase project and generate a google-service.json file.
Configure Firebase with your application
Now download google-service.json file and place it in ‘app‘ module of your Android project. You can also do this using Android Studio. Just switch to “Project” view or perspective of Android Studio and move or paste google-service.json file (that you have just downloaded) to ‘app‘ module of your Android project.

Your project structure should look similar to image above. Now, you might be thinking why do we need this file in first place? Let’s discuss some important facts about google-service.json.
If you open this file in your Android Studio you will see that it contains some important information about your application required by Firebase. And this information is divided into two key parts. One is ‘project_info‘ which contains all of your Firebase project information like your Firebase project number (a long numeric value), project id (an alpha-numeric value that is created by Firebase using your project name), project name and Firebase project URL. Other section is ‘client‘ which help Firebase to identify your Android application whenever you communicate with any of Firebase cloud service like authentication, cloud storage and database, etc.
Add Firebase SDK or Dependencies
Now let’s complete one last step to integrate Firebase in your Android application. And add Firebase SDK or required dependencies in our project.
Let’s open your project or root level Gradle file (build.gradle) to add some required repositories and dependencies.
There is a chance that your project level build.gradle should already have required repository added to it. But, if it don’t have it please add google() maven repository in buildscript -> repositories and allprojects->repostories.
After adding the required Google maven repository, you will have to add one more dependency for Google Service Plugin. Please add this line classpath 'com.google.gms:google-services:4.3.3' in buildscript -> dependencies.
Your final project or root level build.gradle file will almost look like this after adding above repositories and dependencies.
// Top-level build file where you can add configuration options common to all sub-projects/modules.
buildscript {
    repositories {
        google()
        jcenter()
    }
    dependencies {
        classpath "com.android.tools.build:gradle:4.0.0"

        // Google Services plugin
        classpath 'com.google.gms:google-services:4.3.3'

    }
}

allprojects {
    repositories {
        google()
        jcenter()
    }
}

task clean(type: Delete) {
    delete rootProject.buildDir
}
Now open your app or module level build.gradle file and add this line apply plugin: 'com.google.gms.google-services' to apply or add Google Service plugin to your application. It should look something like this.
apply plugin: 'com.android.application'

// Apply Google Services Plugin
apply plugin: 'com.google.gms.google-services'

android { ... }

dependencies { ... }
Now final step is to add dependencies for your required Firebase products or services. You can see complete list of Firebase libraries and latest versions here. For example if you want to use Firebase only for authentication and/or real time database, you will have to add dependency for these libraries in your app level build.gradle file.
dependencies {
    ...
    // To use Firebase Authentication
    implementation 'com.google.firebase:firebase-auth:19.3.1'

    // To use Firebase real time Database
    implementation 'com.google.firebase:firebase-database:19.3.0'
}
Now sync your app by going to ‘File -> Sync Project with Gradle File‘ or by just clicking on ‘Sync Now‘ at right top of your build.gradle file window or tab.
If everything goes well and you have performed all steps correctly to configure Firebase with your Android application. You should see ‘Configure Successful‘ in your Build -> Sync log.
This message also indicate that Firebase has been integrated successfully. And you are now ready to use Firebase products and services in your Android application.
How to test
The most basic or simplest test to check Firebase integration to initialize required Firebase services in your application. This can be easily done using getInstance() method of your required service. Initialization of Firebase authentication and real time database might look like this.
// To initiate or use Firebase Authentication
FirebaseAuth firebaseAuth = FirebaseAuth.getInstance();

// To initiate or use Firebase Database
FirebaseDatabase firebaseDatabase = FirebaseDatabase.getInstance();
If your app compiled and run successfully with above lines then it mean that you have successfully integrated and configured Firebase with your Android application.
Hurray!!
And this is also end of our how-to guide or tutorial for Firebase integration in Android applications.
Please share your valuable feedback and suggestions as comments below. And if you have enjoyed reading this article and it was of any help, please share it with others to help them as well.
You can also see list of all of my guides and tutorials here. I hope to see you soon in another guide or tutorial some other time.
Allah Hafiz.

Hi! I'm Zeeshan Elahi
I have compiled and prepared this content with love for people like me and you. And as you know it always take some time and extra cups of coffee to read, compile and prepare a course or manual. If you have like reading this content and want to say thanks, please consider supporting from more stuff like this.
 Buy me a coffee
 Become a Patron
Najam Saqib
Nice and detailed post!
Thanks for sharing your knowledge!
Zeeshan Elahi Author
Thank you for all the support.